と(堂々と)発表してきたんだけど、
- とはいえ rake タスクを作るの、面倒なんだよなー
- 結局はコードだから、やろうと思えばなんでもできるし、人によって微妙に書き方も違うし。。
といった課題も、無くはなかった。
あとまぁ、これは発表でも言ったけど、結局その rake タスクは AWS に対してしか使えないものだから、その点ではロックインされちゃってるよなーということも。
そんな中、先週の金曜日にあった社内勉強会で、Terraform が取り上げられた。DSL っぽいものを書いて実行したら、その通りの構成を、指定した provider (AWS とか DegitalOcean とか GCP とか)に対して自動で作成してくれる、というもの。発表の仕方が良かったのか、「これいいじゃん!」とすごく感心してしまったので、今日はこれを GCP に対して使って遊んでみることにする。
以下の記事を参考にしました m(._.)m
準備
インストール
その社内勉強会で、「今 homebrew でインストールされる 0.4.1 にはバグがあるっぽいので気をつけて下さい」と言っていたので、公式のダウンロードページ からダウンロードして展開、PATH を通す。今時点で最新は 0.4.2 。
$ export PATH=$PATH:${HOME}/dev/terraform/terraform_0.4.2_darwin_amd64
$ terraform version
Terraform v0.4.2
credential 関係の準備
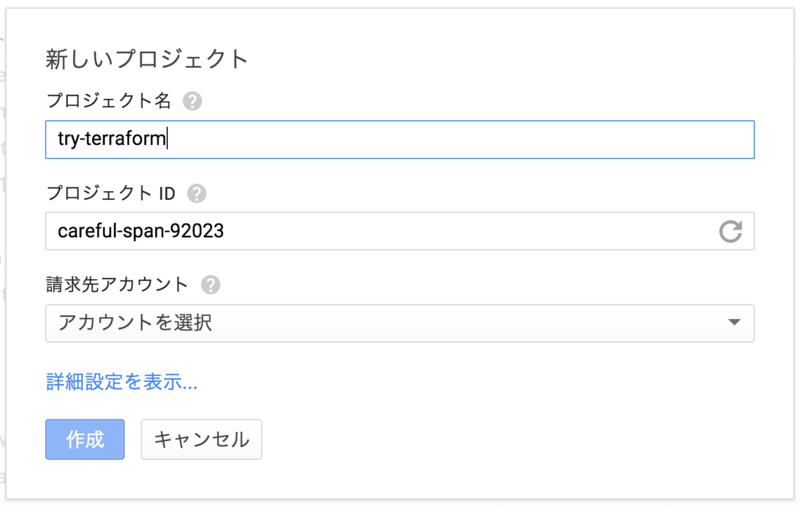
account.json を手元に用意しておく必要がある様子。あとはそもそも、プロジェクトを作成する必要もある。
プロジェクトの作成
既存のプロジェクトのどれかで試してもいいんだけど、それもまぁどことなく気持ち悪いし、今回のためのプロジェクトを作成。

プロジェクトの作成方法とかについては割愛します。あ、あと GCE のインスタンスを立てるので課金設定が必要。
account.json
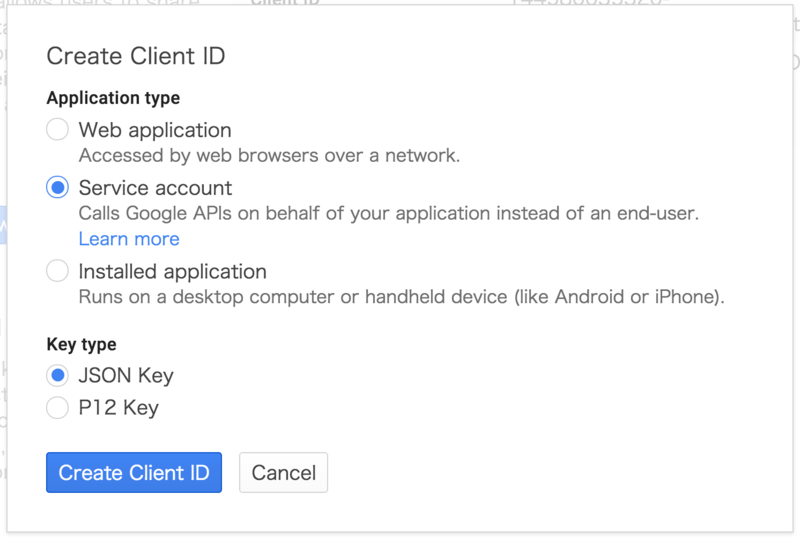
APIs & auth > Credentials から、 Create new Client ID する。

アプリケーションタイプを求められるので、 Service Account を選択し ok すると、 json がダウンロードされる。

この json ファイルは、作業場所に置いておくことにする。
実践・GCE インスタンスの create と destroy
terraform で扱うファイルは、だいたい .tf 拡張子を付けるみたい。作業場所に gce.tf という名前の下記のようなファイルを作ってみる。
# Configure the Google Cloud provider
provider "google" {
    account_file = "./credentials/account.json"
    project = "try-terraform"
    region = "asia-east1-a"
}

# Configure the Google Compute Engine Instance
resource "google_compute_instance" "default" {
    name = "test"
    machine_type = "f1-micro"
    zone = "asia-east1-a"
    tags = ["try-terraform"]

    disk {
        image = "debian-7-wheezy-v20140814"
    }

    network_interface {
        network = "default"
    }
}
Configure the Google Cloud provider のところでは、どの provider にするかの指定(今回は GCP なので "google" )と、作業を行う GCP に関する情報を記述している。公式ドキュメント。特に難しいことはない。
Configure the Google Compute Engine Instance で、これから立てようとしているインスタンスの情報を resource "google_compute_instance" として指定する。ここで設定している内容は、多分必要最小限。google_compute_instance リソースの公式ドキュメントを見ると、他にもいろいろ設定できるみたい。単純比較はできないと思うけど、指定可能項目はまだ若干、AWS EC2 の方が多いかも。
ここまでできたら、早速これを使ってインスタンス立ち上げ...といきたいところだけど、記述内容に文法的な誤りがないかどうか・これを実際に動かしたらどういうことが行われるか、を確認できる terraform plan コマンドがある。これをやってみる。
$ terraform plan
Refreshing Terraform state prior to plan...


The Terraform execution plan has been generated and is shown below.
Resources are shown in alphabetical order for quick scanning. Green resources
will be created (or destroyed and then created if an existing resource
exists), yellow resources are being changed in-place, and red resources
will be destroyed.

Note: You didn't specify an "-out" parameter to save this plan, so when
"apply" is called, Terraform can't guarantee this is what will execute.

+ google_compute_instance.default
    can_ip_forward:              "" => "0"
    disk.#:                      "" => "1"
    disk.0.auto_delete:          "" => "1"
    disk.0.image:                "" => "debian-7-wheezy-v20140814"
    machine_type:                "" => "f1-micro"
    metadata_fingerprint:        "" => "<computed>"
    name:                        "" => "test"
    network_interface.#:         "" => "1"
    network_interface.0.address: "" => "<computed>"
    network_interface.0.name:    "" => "<computed>"
    network_interface.0.network: "" => "default"
    self_link:                   "" => "<computed>"
    tags.#:                      "" => "1"
    tags.1564706445:             "" => "try-terraform"
    tags_fingerprint:            "" => "<computed>"
    zone:                        "" => "asia-east1-a"
+ google_compute_instance.default となっているので、思惑通り、インスタンスがひとつ、追加されることになりそう。
ただこの plan 、あまり過度な期待を持ってはいけないそうで、 .tf ファイルのシンタックスチェックくらいのつもりで捉えておくぐらいが良いそうな。
いよいよ、適用、の前に、実行前の状態を Webコンソールで確認しておく。

...うん、何もないね。
では、 terraform apply で実行!
$ terraform apply
google_compute_instance.default: Creating...
  can_ip_forward:              "" => "0"
  disk.#:                      "" => "1"
  disk.0.auto_delete:          "" => "1"
  disk.0.image:                "" => "debian-7-wheezy-v20140814"
  machine_type:                "" => "f1-micro"
  metadata_fingerprint:        "" => "<computed>"
  name:                        "" => "test"
  network_interface.#:         "" => "1"
  network_interface.0.address: "" => "<computed>"
  network_interface.0.name:    "" => "<computed>"
  network_interface.0.network: "" => "default"
  self_link:                   "" => "<computed>"
  tags.#:                      "" => "1"
  tags.1564706445:             "" => "try-terraform"
  tags_fingerprint:            "" => "<computed>"
  zone:                        "" => "asia-east1-a"
google_compute_instance.default: Creation complete

Apply complete! Resources: 1 added, 0 changed, 0 destroyed.

The state of your infrastructure has been saved to the path
below. This state is required to modify and destroy your
infrastructure, so keep it safe. To inspect the complete state
use the `terraform show` command.

State path: terraform.tfstate
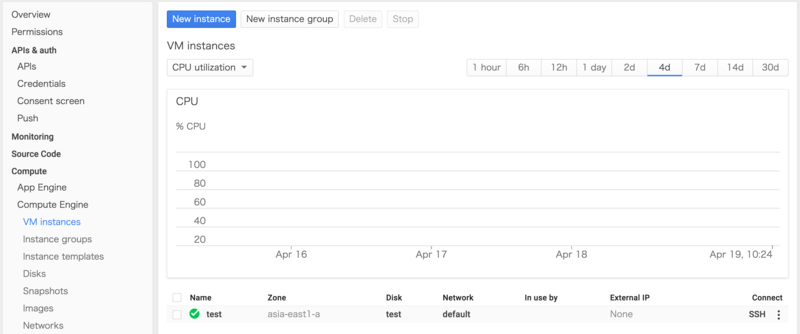
よさそう! Webコンソールも見てみる。

おおw いいねww
ここでふと、作業していた場所を見てみると、terraform.tfstate terraform.tfstate.backup の2つのファイルができている。
前者は、現在のインフラの状態を表したもの(json)で、後者は前回作業との差分(これまた json)。Terraform からは行えないこともまだ多分いくつかあると思うけど、少なくとも Terraform から行えることに関しては、Terraform 以外から(手作業で、とか)はやらないほうがよさそう。
さて、最初の10分で課金・以降は分単位で課金というのが GCE さんの良いところだけど、立てっぱなしももったいないので消しましょうそうしましょう。コマンドは terraform destroy 。
$ terraform destroy
Do you really want to destroy?
  Terraform will delete all your managed infrastructure.
  There is no undo. Only 'yes' will be accepted to confirm.

  Enter a value: yes

google_compute_instance.default: Refreshing state... (ID: test)
google_compute_instance.default: Destroying...
google_compute_instance.default: Destruction complete

Apply complete! Resources: 0 added, 0 changed, 1 destroyed.
Webコンソールも見てみる。

まるで GCE インスタンスなんて一度も立てたことがなかったような画面。w
以上で今回の Try Terraform はおわり。
今回作成したファイル類
大したものは作ってないけど、GitHub に上げてます。commit を追ってもらえれば、上述の通りの流れを確認できます。
感想
これを書いてる今時点で、GCP だと下記のリソースにのみ対応しているみたい。
- google_compute_address
- google_compute_disk
- google_compute_firewall
- google_compute_forwarding_rule
- google_compute_http_health_check
- google_compute_instance
- google_compute_instance_template
- google_compute_network
- google_compute_route
- google_compute_target_pool
でも、これも社内勉強会で出た話なんだけど、「Terraform は v0.4 までで安定性をまず確保し、これ以降は対応 resouce の拡充に本気出す」フェーズだそうで、今後が俄然楽しみなプロダクトだと思った!
GCE は、個人的にはイカしてるなぁと思っていて(起動スピードとか課金の仕組みとか)、でもポチポチやってインスタンスを立ち上げるのはダサい・でも rake タスクみたいなのを作るのも面倒臭い、みたいなデッドロックに陥ってしまってたんだけど、今回この Terraform のおかげで僕と GCE との距離が縮まった気がしてる!
あとこれ、将来的には provider を変えるだけで同じような構成を別の provider でも再現できる、とかってなれば、それこそロックインのない世界が広がって素敵なのになぁ、と妄想したりもした。別にそこまでロックインされるのをイヤがってるわけじゃないんだけどw

Google Compute Engine入門 (アスキー書籍)
- 作者: 吉積情報株式会社吉積礼敏
- 出版社/メーカー: KADOKAWA / アスキー・メディアワークス
- 発売日: 2014/07/31
- メディア: Kindle版
- この商品を含むブログ (2件) を見る
